Tuesday, September 10, 2019

How to perform PITR(point in time recovery) in PostgreSQL v12

How to perform PITR in PostgreSQL specially in  v12 where recovery.conf file is no more valid.  This blog is all about the setup and recovery.

if some important data got deleted or some table lost which we want to recover - we can get it by performing PITR .

Steps to perform PITR in PG v12
========================

in  PG conf file -   archive_mode and archive_command GUC variable should be set


Make sure - /tmp/archive_directory directory exists on machine . /tmp is not a good location to store the WAL files. 


 Start the server /create table with data -


There are 2 important folders - pg_wal which reside under data directory and archive_directory which we have created explicitly (under /tmp).

pg_wal folder contain all the data history records e.g insert/update/delete all records stored in the files but after a certain limits of these files -it started overriding . To make sure -we have preserve  all the WAL files  before it override - we archive it  by archive_command =cp '%p /tmp/<location/%f' ..
This process can be called 'incremental backup'.

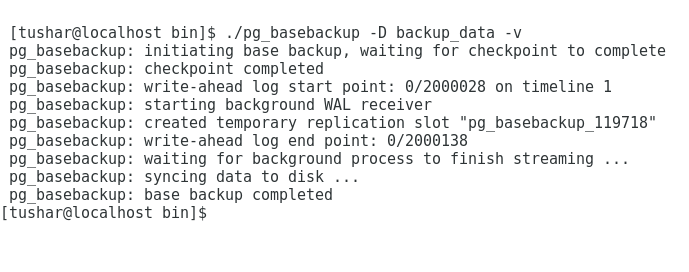
Perform pg_basebackup ( to perform online full backup )


Scenario is -
at X time- User has dropped all the rows  = count is 0 rows
at Y time- User has inserted  50 rows =count is 50 rows
at Z time- User has inserted 1 lakh rows =count is 1 lakh 50  rows

We want to  perform recovery at Y time  where count is 50 rows.


at X time -

at Y time -


at Z time - 


X time =2019-09-10 17:53:13
Y time =2019-09-10 17:55:48
Z time =2019-09-10 17:58:05


Now, Time to perform recovery till Y time

Stop the  Server (./pg_ctl -D my_data stop -m i)
Go to folder - backup_data (full backup ,which we have taken earlier)
Open postgresql.conf file and add these below GUC parameters


Recovery is now (in v12) initialised by a file called 'recovery.signal'  - empty file need to be create manually in data directory folder .


Start the server -


recovery.signal file has been automatically removed from data folder .
Connect to psql terminal and check the data


Data has been recovered till Y point . 

Friday, September 6, 2019

How to install PostgreSQL using YUM

Installing any software using YUM is one of the easiest way where it will resolve all the dependencies . YUM is a  command/utility for installing/updating/deleting RHEL (and family like CENTOS/FEDORA)  RPM software packages as well as third party repositories in one single command.

YUM( Yellowdog Updater Modified) V/s RPM (Redhat Package Manager)
YUM is nothing but an another way to install RPMs , it  resolve dependencies easily ,connect to online repositories and can update software whereas with using RPMs -it is not quite easily  possible but advantage of installing using RPMs is that we don't need internet connection but in case of YUM- we cannot do without net.

Installation of PostgreSQL using YUM
============================
Go to yum.postgresql.org webpage (https://yum.postgresql.org/repopackages.php)
We are on Centos 7 64 bit machine , so need to look for repository  package  for  Centos 7-x86_64
Click on "Centos 7 -x86_64"

a file called pgdg-redhat-repo-latest.noarch.rpm -  will be downloaded


Connect to Root user (YUM command cannot be fire from non root user)

Install RPM package using rpm -ivh command


under /etc/yum.repos.d , a file will be created


Open this file and enable - whatever PostgreSQL server version you are looking , in this case - i have enabled PG v11 and rest all others are disabled


Before installing PG , we need to make sure epel-release package is installed on Centos 7.X machine
On my system , it is installed otherwise i need to fire 'yum install epel-release'


EPEL - Extra package for Enterprise Linux  (epel-release) is a open source community repository project which provide adds-on software which is required to install PG successfully. 

Perform yum clean all and yum make cache 

yum clean all -clean all the old cache 
yum makecache -is used to download and make usable all the metadata for the currently enabled yum repos


Time to install PG v11

yum install postgresql1-server


Press 'Y'


PG v11 is installed successfully on machine

rpm -ql <package name> - we can know the location  from where the files have copied


Initialise the Cluster -

Start the Service - 

check the status -


Connect to psql terminal -


Wednesday, September 4, 2019

Is setting logical replication easy in PostgreSQL ?

Well, Yes but before setting  logical replication , first thing we need to understand is  -
What is streaming replication(SR) ?
What is the difference between physical replication V/s logical replication ?

Streaming replication - gives you the power to continue send the WAL(Write ahead logs) records to the Slaves so that it can be in SYNC and if something unexpected  happened to master
for instance - if its goes down / Data Centre where Master hard disk stored hit by earthquake  , SLAVE can become the saviour and save the world. For more details please refer -PG Wiki

Logical replication - is a method to replicate the data  using replication identity whereas Physical replication is a method to replicate data using byte to byte replication. The advantage of logical replication is that here is no need to replicate ALL the tables but we can select only few specified which we want to replicate also in logical replication - we need not to create Master/Slave relation where Slave is read-only till the time it get promoted in the event of master down.

In logical replication - We have Publication and Subscription mechanism where Publication from where we are taking the data and Subscription -from where we are replicating  it.

Steps by Steps to Setup logical replication  on two database clusters-
================================================
.) PG v12 Beta 3 Sources on Centos 7
.)Perform initdb , change wal_level=logical in postgresql.conf file , start the server and connect to psql terminal  ,Create one table


.)Perform another initdb , start the server and connect to psql terminal  ,create table 'test' (same which we have created in cluster1) - here there is no need to change wal_level.

Case 1-


.) Create Publication on Cluster1 -by default  using option 'all tables'  which means all the tables will be published.


.)Create Subscription on Cluster2

.)logical replication slot is created on cluster1


logical replication service is started in the background


Time to insert data on Cluster1 . data will be replicated in cluster2


If we want to update/delete data from cluster1 then we need to set replica identify using alter table command.

Case 2 - When we want to  publish  few tables out of X tables 

Lets assume  - We have 5 tables in cluster1 (e.g Table - Table1,Table2,Table3......Table3) and now we only want to publish first 3 tables 


Connect to cluster2 and first create the tables which we want to subscribe from cluster1 and then create subscription .. if table doesn't exists then create subscription will fail , for ex- 


Create Table3 and now subscription which is based on publication pub will be created successfully 


Insert on table1/table2 which is on Cluster1 .. data will be replicated on Cluster2 side as well ..